RIB Current Sensors

Many technical calls that I have answered have been in regards to our RIB® current sensors and the different features these popular little devices have. In this week’s Tech Tuesday blog entry, I would like to give a general overview of the RIB current sensors and include an explanation of the different features that I highlight during a technical call. I hope that reading this week’s post gives you a better understanding our RIB current sensors. Choosing the right model from the start will save time, money, and a possible “doh” along with a bump to your forehead with your palm after talking to our technical support about why your current sensor is not doing what you want it to do!
Solid Core vs Split Core
When somebody calls in looking for a current sensor to meet their desired specifications, I usually start by asking: “Would you like a solid or split core current sensor?” Asking that question helps me to narrow the results rather quickly. If the application is in a new installation, I suggest a solid core model. It’s a good choice because there will be less of a chance that wires will need to be cut to install the current sensor. If the installation is a retrofit, I typically suggest split core. In this scenario the current sensor core may be “split” apart (opened) and the wire may be inserted into the core to be sensed. The solid core does have an advantage in terms of the low end of the sensing range: 0.25-0.5 Amp for solid core vs. 0.5-0.75 Amp for split core. The low end of the sensing range determines when the normally open dry contact output of the current sensor will close.
Wires vs Terminals
Another question that I typically ask is whether or not there’s a desire for a wired connection or terminal connection to the current sensor. To be honest, this typically falls in the area of personal preference. If one does not mind using wire nuts to make the connection to the sensor output, a wired model may be suggested. If terminals help to clean up the wiring of the device and a certain kind of wire color is preferred, one may order a model with terminals (“T” in the model name). The terminals have an opening that is large enough to allow a 14-22 AWG sized wire to be terminated.
Fixed Threshold vs Adjustable Threshold
Probably the most important question I ask someone is whether they want the threshold of the current sensor to be at a fixed value or an adjustable value. If one has ensured that the load being monitored does not consume any current until activated, and there’s no chance for a lower current level to be sensed after it is on, then a fixed model (“F” in the model name) may be chosen. If one finds that there is a leakage or standby current that is large enough to be detected by the current sensor, it would be wise to choose an adjustable model (“A” in the model name). The adjustable model has the ability to be adjusted to “look over” the leakage or standby current so that a false positive is not caused. Specific thresholds and other specifications may be found on the respective product data sheets on our website.
What is that little plastic tab in the box with the current sensor?
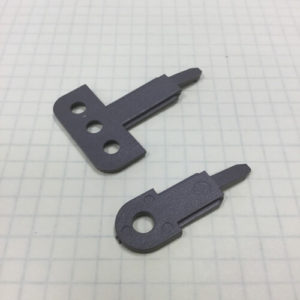 I have never personally been asked this question over the phone, but I assume the function of the little plastic tab that comes with the current sensor is not widely known. I imagine it is mostly thrown out along with the small RIB® box and the installation instruction paper, but after this brief explanation, perhaps you may find a use for this nifty little plastic piece. Here within the company, we call those little plastic pieces “mounting tabs,” and the name describes their use. Perhaps a dangling current sensor on a wire is unsightly within the panel or wherever else the current sensor is used. Use this little mounting tab to fasten the current sensor to the wall or a face within a panel! Use the appropriate sized screw(s) to fasten the tab to the mounting surface, and then slide the current sensor onto the tab. Easy as that! Now that looks better, doesn’t it?
I hope this blog helps bring to light some of the great features associated with our RIB current sensors. As always, we are glad to answer any of your RIB® related questions, so feel free to give us a call or send in an email and either myself or four other engineers will help you the best we can!